Add user roles to the ID token with custom action
I have always presented different use cases for the Atoti Community Edition. After experiencing and being satisfied with the Python BI analytics platform, some users ask for authentication and access management. This can easily be accomplished with the use of Atoti+ plugin.
This article is part of a series that explains how we can implement secured and managed access with Atoti+. It is mainly intended for projects that have decided on using Auth0 as their authentication providers.
Check out the corresponding YouTube video.
Type of authentication mechanisms
Talking about authentication and access management, it revolves around users. Given that big corporations usually have their existing user management solutions, it makes sense to integrate with their existing authentication provider.
Before diving into Auth0 setup, let’s take a look at the types of authentication mechanism that Atoti+ supports:
Users need to be aware that while the above is used for authentication, not all of them support user management, i.e. user profile information and roles.

For instance, with basic authentication, we define username, passwords and their roles in Atoti. Kerberos handles the authentication of users but not the user roles. Likewise, connecting Google Cloud credentials via OIDC, we are only able to authenticate users but not download their associated roles to Atoti. Therefore, we will assign users their roles in Atoti.
We can use LDAP and OIDC for both user management and authentication (with the exception of Google Cloud credentials via OIDC). We download the roles assigned to users from these authentication providers upon login and map them to the roles defined in Atoti in order to achieve access management.
Check out Atoti notebook gallery for sample implementations of Basic Authentication, OIDC and LDAP with Atoti+.
Auth0 Setup
If you haven’t had an authentication provider already and would like to try out the security implementation with Atoti+, give Auth0 a try.
Auth0 offers a free plan that allows up to 7000 users and you can always upgrade to a different plan as required for your project.
If you’re an existing user of Auth0, you may want to skip to the section on “ Create custom action to add roles to ID token ”.
Create Application
Let’s start by first creating an application for Atoti in Auth0. Navigate to the Applications page and click on the “+ Create Application button”.
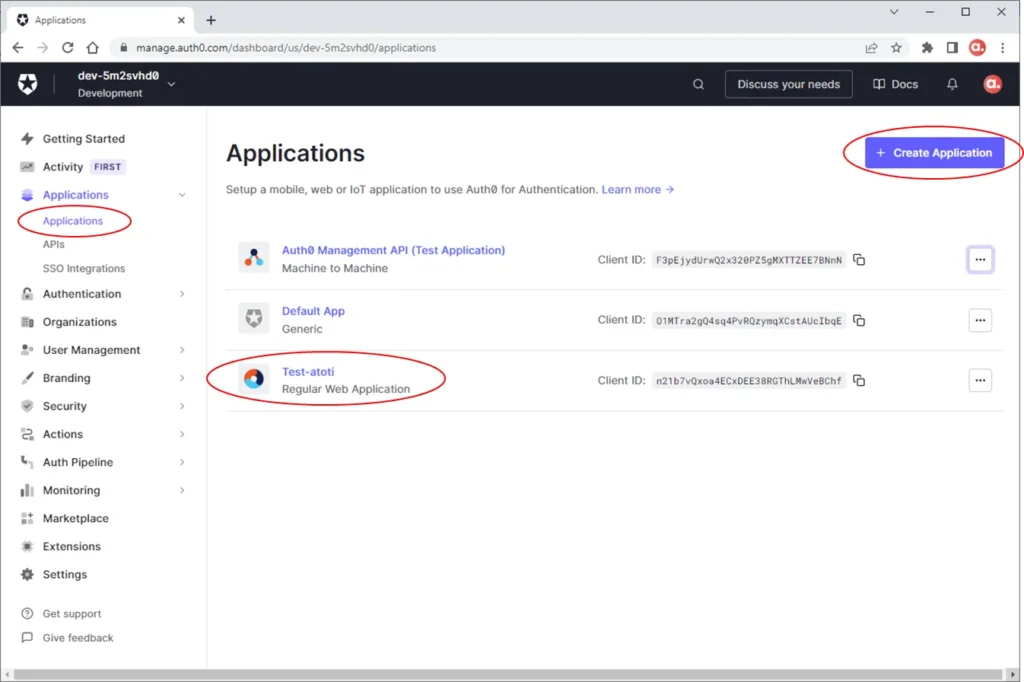
Select the application type “Regular Web Applications” for our Atoti+ project.

Upon creation of the application, we now have the basic information required to configure our OIDC connection in Atoti.
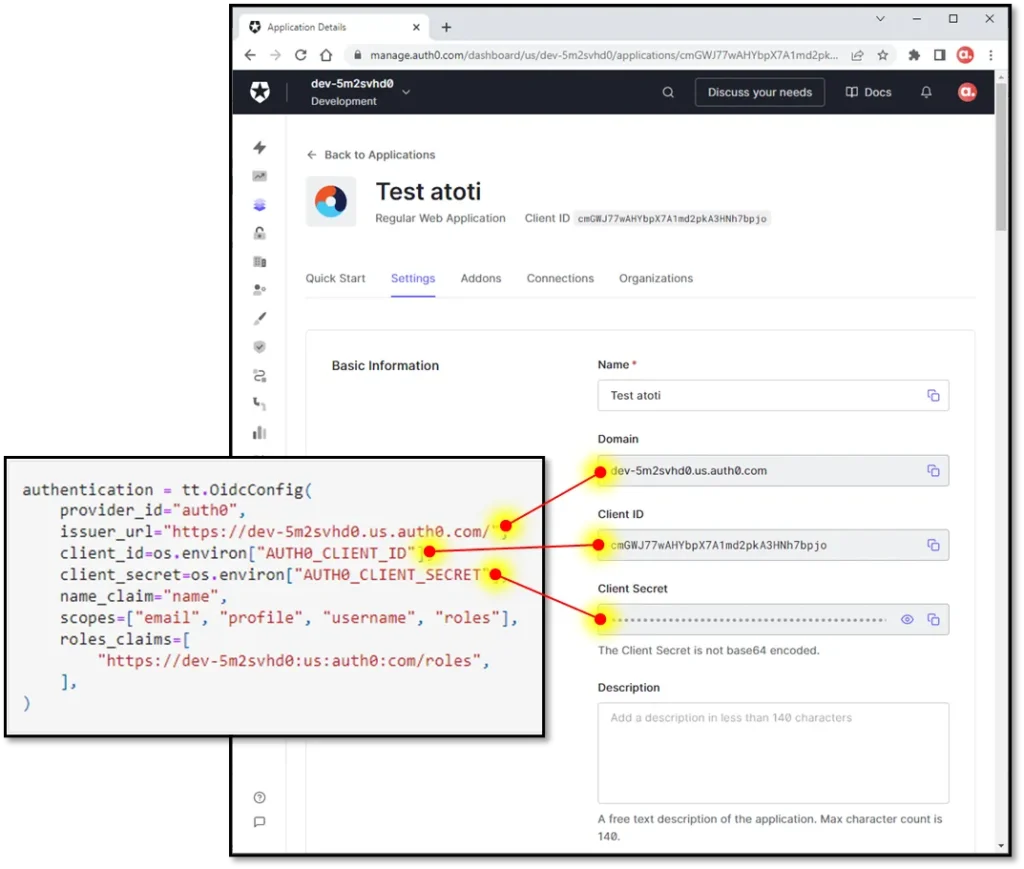
We will dive into the Atoti OIDC configuration in the next article.
Update Application URIs
We need a fixed URL to configure the application URIs in our Auth0 setup. Thus, we should configure our Atoti session with a fixed port. Otherwise, a random port will be assigned for the web application.
With this in mind, fix the port in Atoti during instantiation of the session as follows:
session = tt.Session(port=10011)The below Atoti code snippet will return the Atoti web application URL:
session.link()With the web application URL, let’s navigate to the Application URIs section which is on the same Settings tab of the application page in Auth0.
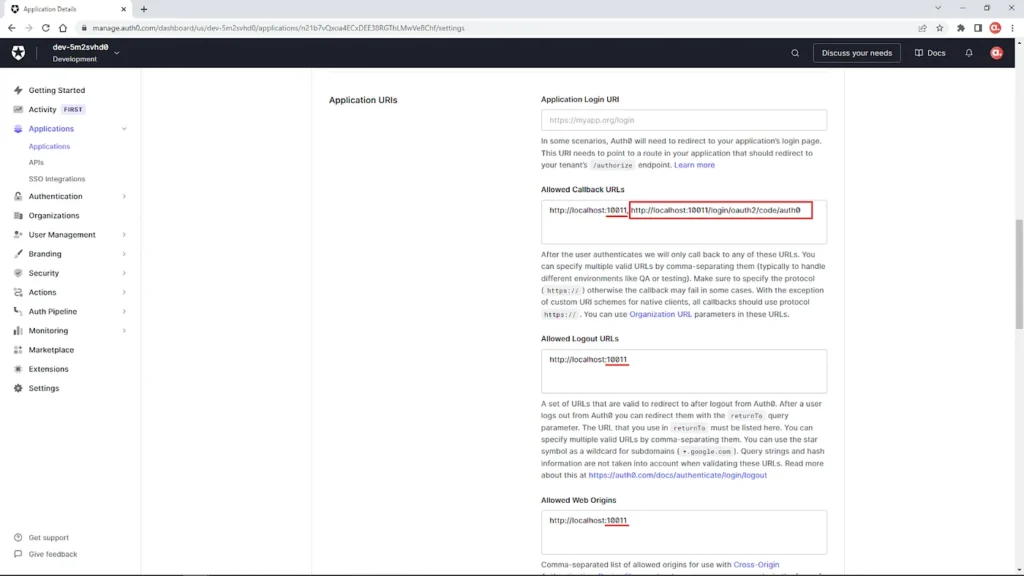
Update the Allowed Callback URL, Allowed Logout URLs and Allowed Web Origins with the web application URL. Remember to include the following callback URL with the provider id set to auth0:
f"{session_url}/login/oauth2/code/{provider_id}"
Create custom action to add roles to ID token
For Atoti to apply the correct access control, we need to create a custom action that will add user roles to the ID token returned in the user’s profile.
To do so, navigate to the Library page under the Actions menu and click on the “Build Custom” button. Let’s name the action according to its purpose. The trigger for this action is the Login/Post Login action.
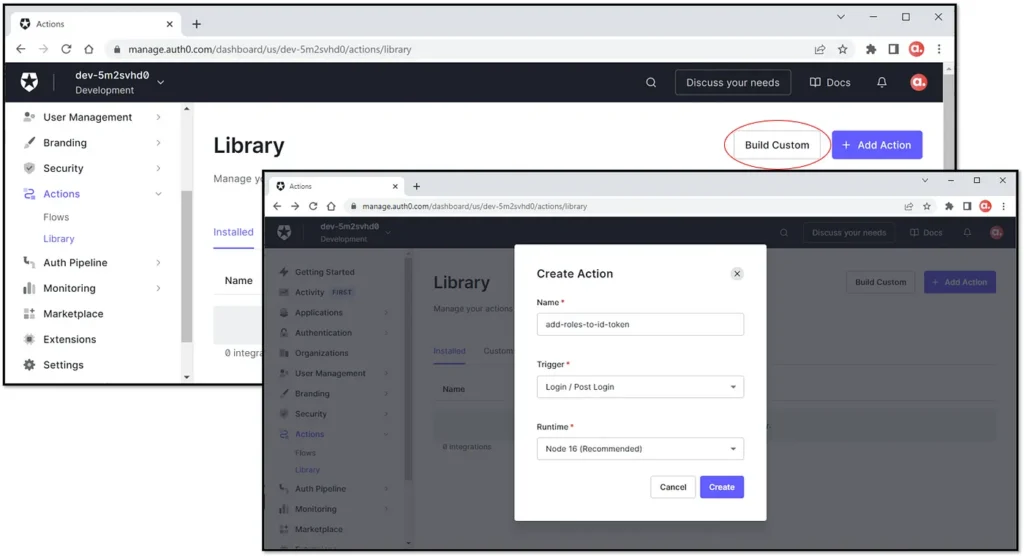
There are some sample code snippets in the Auth0’s documentation for actions that we can add to the Login flow. In fact, we will reference the snippet for adding user roles to ID and Access tokens:
/**
 * @param {Event} event - Details about the user and the context in which they are logging in.
 * @param {PostLoginAPI} api - Interface whose methods can be used to change the behavior of the login.
 */
exports.onExecutePostLogin = async (event, api) => {
  const namespace = 'https://my-app.example.com';
  if (event.authorization) {
    api.idToken.setCustomClaim(`${namespace}/roles`, event.authorization.roles);
    api.accessToken.setCustomClaim(`${namespace}/roles`, event.authorization.roles);
  }
}
In my use case, I’ve used the domain assigned to my Auth0 application for the namespace.
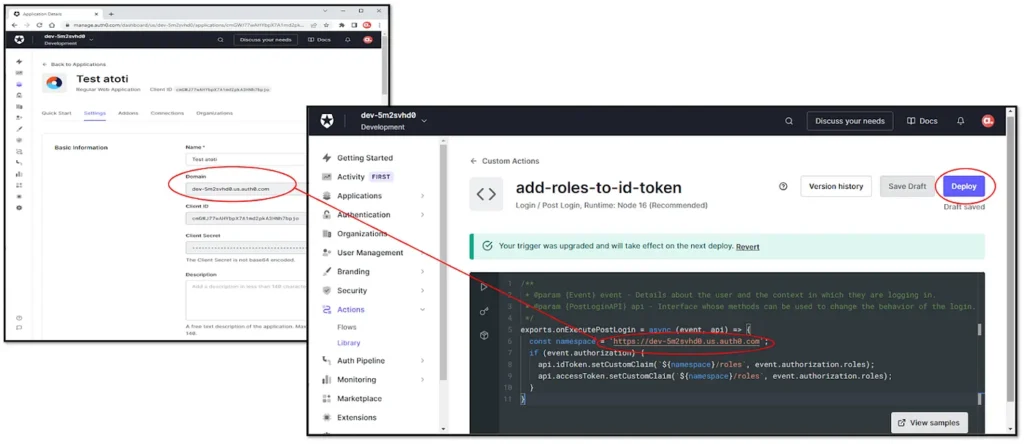
Deploy the action so that we can apply it in our login flow.
Apply custom action to the Login flow
The below GIF shows how we can add our custom action to the login flow.
Toggle to the Flows page from the Actions menu and access the Login flow. It is a simple two-step process:
- Start – the user is authenticated and logged in
- Complete – the token is issued
We will add the roles to the token by intercepting the flow before the token is issued. To do so, simply drag and drop the custom action in between the two steps and apply.
Create Roles
Depending on your organization structures, create the necessary roles to group the users based on their job functions. I will spare you the process of user creation as it’s rather intuitive.
However, do know that role names in Auth0 can be different from the roles in Atoti as it is a one-to-many map against the Atoti roles. For instance, we can have the Auth0 role “Atoti user” which maps to “ROLE_USER” in Atoti.
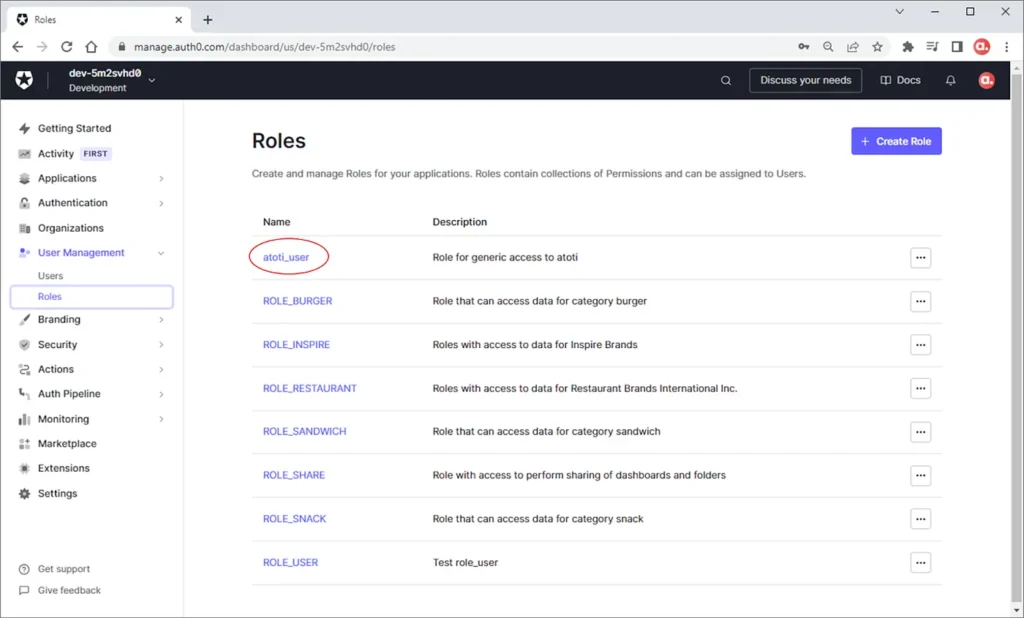
In the event that all the users are allowed to share their dashboards, we will map the role “Atoti user” to both “ROLE_USER” and “ROLE_SHARE” in Atoti:
session.security.oidc.role_mapping.update(
    {
        "atoti_user": ["ROLE_USER", "ROLE_SHARE"]
    }
)
Do note that each user requires the Atoti role “ROLE_USER” to be able to access the web application.
Create Users – Login with email or username
By default, Auth0 captures the user’s email address for the login. However, we can also use a username for the login. To do so, navigate to the database connection used by the application under the Authentication menu.
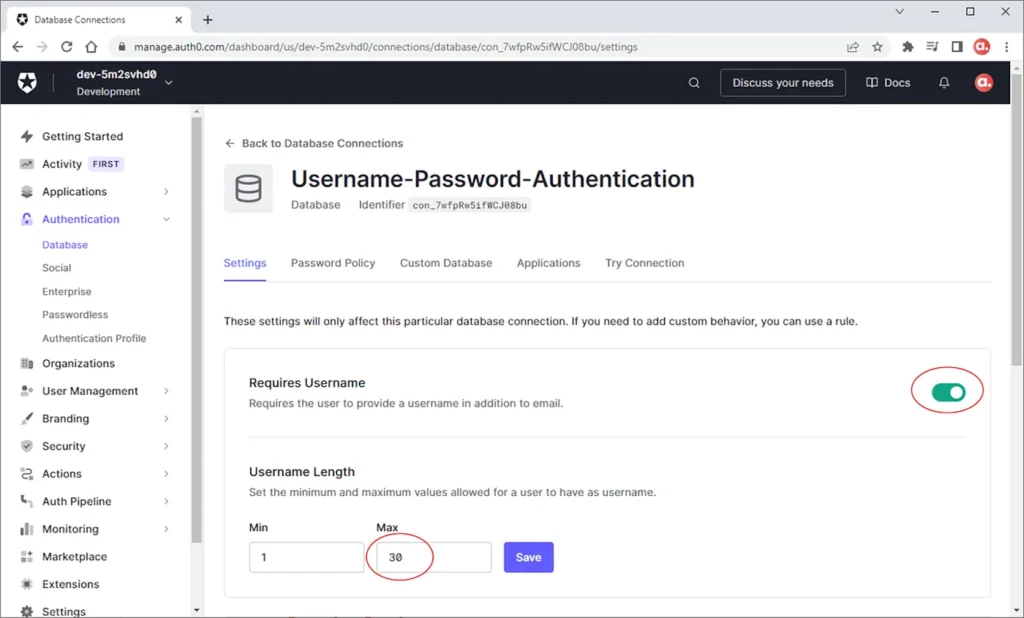
Toggle the switch for the “Requires Username” and also remember to set the maximum permissible length for the username.
We will now be able to capture the Username when creating a user.
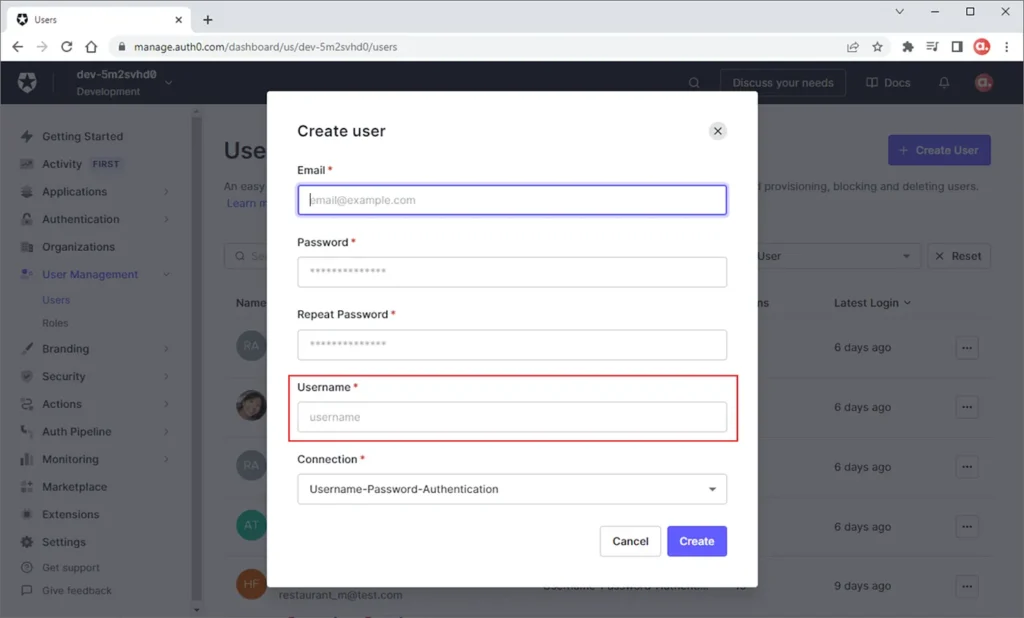
So, simply fill out the form to create the user. Just remember to assign the roles to the user.

Test connection
In the database connection used by the application, there is a function to try the connection.
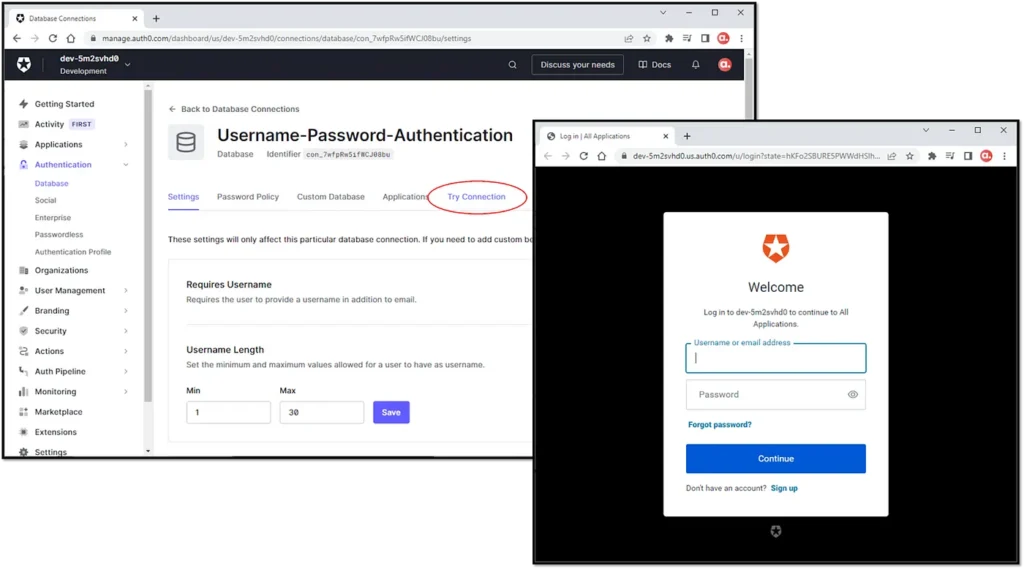
Test the connection by logging in with one of the created users.
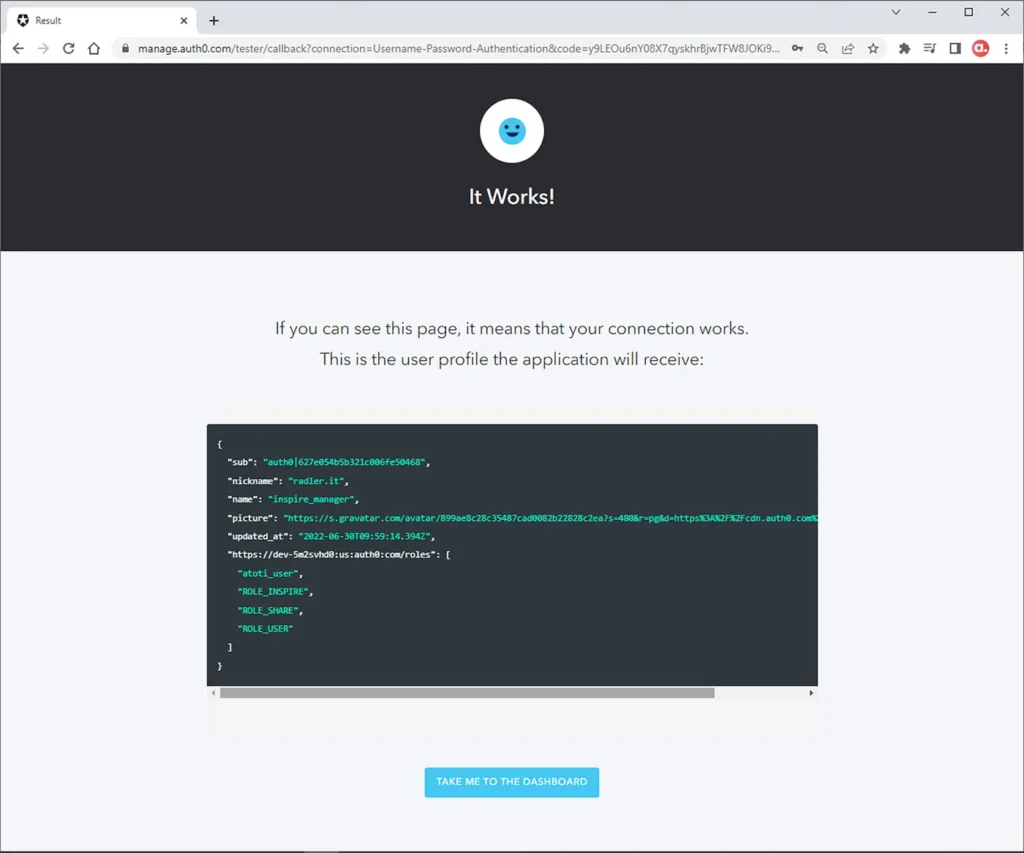
Success! Take a look at what the application will receive in the user profile. It will be useful for our OIDC configuration in Atoti as I will show you in the next article. Stay tuned!


